
NOTE: links in the post will not open in a new window or tab unless you right click them and tell them to. Blogger isn't playing nicely with links today it seems!
How do you like my new background!?
I picked it up from “cute n cool”.
Don’t you just love it? I do!
It's "da bomb" as my son would say! lol

I was able to get some more done on some of my projects.
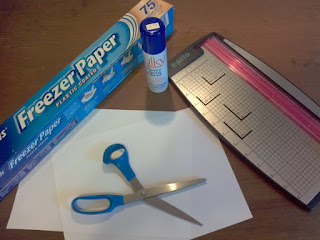 You will need freezer paper, any brand I’m sure is fine. I just happened to have this on hand. Also
you will need scissors, spray adhesive (I only had temporary adhesive on hand,
and a sheet of printer paper for each project you are working on.
You will need freezer paper, any brand I’m sure is fine. I just happened to have this on hand. Also
you will need scissors, spray adhesive (I only had temporary adhesive on hand,
and a sheet of printer paper for each project you are working on.
 Measure out enough freezer paper to adhere your printer paper to and cut
it off.
Measure out enough freezer paper to adhere your printer paper to and cut
it off.
 Then spray the adhesive on the non-shiny side of the
freezer paper and stick your printer paper to it.
Then spray the adhesive on the non-shiny side of the
freezer paper and stick your printer paper to it.

 Trim the freezer paper to the same size or slightly smaller than the printer paper. You can do this with scizzors if you have a steady hand. I don’t so I used my handy dandy little pink paper trimmer I got on clearance for half-off at Walmart.

 Next, you want to pull up on your computer, the
graphic that you want to transfer. I had already flipped my graphic so that it
would print backwards. If you don’t know how to do that, just use Paint to open
your graphic and use the flip horizontal tool and then save as a new file.
Next, you want to pull up on your computer, the
graphic that you want to transfer. I had already flipped my graphic so that it
would print backwards. If you don’t know how to do that, just use Paint to open
your graphic and use the flip horizontal tool and then save as a new file.
 Print out the flipped image on your ink jet printer. Be sure to insert the paper in an empty paper
tray and turn it over if necessary so that the printer will print on the shiny
plastic side. If you don’t know which way to put it, print out onto regular paper but first mark an X in the bottom right hand corner. If the printer prints on the side with the X
you should insert your page shiny side up. If it prints on the opposite side
than the X, load your page shiny side down.
Print out the flipped image on your ink jet printer. Be sure to insert the paper in an empty paper
tray and turn it over if necessary so that the printer will print on the shiny
plastic side. If you don’t know which way to put it, print out onto regular paper but first mark an X in the bottom right hand corner. If the printer prints on the side with the X
you should insert your page shiny side up. If it prints on the opposite side
than the X, load your page shiny side down.
Be careful and don’t touch the ink or it will smear. They say it will not
dry either but just in case I always have my project ready so that I can
transfer right away.
 Then you want to place it on the item to transfer to and run a spoon back
and forth over the image to get the ink to stick to the surface of the item.
Then you want to place it on the item to transfer to and run a spoon back
and forth over the image to get the ink to stick to the surface of the item.
 And this is what I ended up with! Ugh!
Ok, so let’s try this again!
And this is what I ended up with! Ugh!
Ok, so let’s try this again!
 Again, Ugh!!! This time I had
lightly ran a damp sponge over the surface like the tutorials tell you. FAIL!
Again, Ugh!!! This time I had
lightly ran a damp sponge over the surface like the tutorials tell you. FAIL!
Next I tried a 3rd time
[by now I’m steaming from the ears and
VERY frustrated]
but this time I roughed
up the painted surface with some fine sandpaper.
And here is what I got:
 Much better but I’m still not too happy with it!
What is the deal?? I
did this method with the little bed I’m working on and I didn’t have ANY
problems at all!
Maybe first time was a
charm?
[rolls eyes]
Anyway, I was tired of trying with that project so I went on to the blue
tray. The printer jammed just a bit at the beginning and messed it up before I
could fix it but I figured these things aren't supposed to be perfect
anyway. They are supposed to look old
and all you know? So I said what the
heck and I used it anyway.
The printer jammed just a bit at the beginning and messed it up before I
could fix it but I figured these things aren't supposed to be perfect
anyway. They are supposed to look old
and all you know? So I said what the
heck and I used it anyway.
 And this is what I ended up with!
The surface is not glossy by any means
so I don’t know why it didn't transfer properly. Back to the printer!
This time I sprayed some of the adhesive onto the tray right before I put
the transfer on it and this is what I got!
 Much, much better don’t you think?
(You can click on any image to zoom in)
Much, much better don’t you think?
(You can click on any image to zoom in)
 So here are the two items side by side.
I am pleased with the tray but now looking back at the trunk lid, I
decided that it STILL sucked! So I
washed off the ink as best as I could and then repainted the darn thing because
not all of the ink would come off! It will now have to wait for another day or
two to dry before I can try again. [sigh]
So here are the two items side by side.
I am pleased with the tray but now looking back at the trunk lid, I
decided that it STILL sucked! So I
washed off the ink as best as I could and then repainted the darn thing because
not all of the ink would come off! It will now have to wait for another day or
two to dry before I can try again. [sigh]

 This puppy is now on eBay with a starting price of $14.99.
http://cgi.ebay.com/ws/eBayISAPI.dll?ViewItem&item=280965686355
Click this link to
view the auction.
This puppy is now on eBay with a starting price of $14.99.
http://cgi.ebay.com/ws/eBayISAPI.dll?ViewItem&item=280965686355
Click this link to
view the auction.
(sorry blogger isn't working properly today for links)


And you can click this
to go to the auction for that little comforter and pillow sham I made for the baby bed and then decided against.
So here is that seed box I mentioned earlier this week but forgot to post
the pictures of:

I went online and found a bunch of images of original seed packets from
this company and placed them on my templates in MS Publisher.
Now, I would rather
use Pagemaker or Illustrator,
but Windows 7 won’t let me install them no matter
what I try!
Darn technology!
I can’t even install my version of
Photoshop!
It’s a crime I tell you!
Anyway, back to the project.
The pic below shows how I printed them off
the first time.

It seems today nothing
wants to cooperate.
Ever had one of
those days?
Well I am having one now.
They turned out WAY too small. So
I had to increase the size. I tried to increase it to the inside dimensions of
the box but….. well, I will save that for later.
 So, once I had printed them out AGAIN, I used my handy dandy little
trimmer to trim as much of them as possible. Then I had to leave to pick
Sweetie up from work so I took them with me and sat in the car trimming them
while I waited for him to get off work.
So, once I had printed them out AGAIN, I used my handy dandy little
trimmer to trim as much of them as possible. Then I had to leave to pick
Sweetie up from work so I took them with me and sat in the car trimming them
while I waited for him to get off work.
 Once I got home, I used the ruler on paper slicer to line up the packet card stock and then I used a letter opener to “score” the backside of the packets where they would be folded. This enabled me to make a straight fold with the heavier paper.


 Here they are all folded and glued.
And remember earlier I said I would save that for later?
Well after all that work, they still ended up one inch more narrow than the box!
[I thought I was going to cry!]
Here they are all folded and glued.
And remember earlier I said I would save that for later?
Well after all that work, they still ended up one inch more narrow than the box!
[I thought I was going to cry!]
I think I may put some seed beads inside the packets so that they appear to
actually have seeds in them! lol
Well, that’s it for today. I don't think I could take another Ugh today. Hopefully this
and the trunk projects will be done by the time of my next post! And hopefully with fewer set-backs! Wish me luck.
Thanks for stopping by and Happy Crafting!
NOTE: links in the post will not open in a new window or tab unless you right click them and tell them to. Blogger isn't playing nicely with links today it seems!
How do you like my new background!?
I picked it up from “cute n cool”.
Don’t you just love it? I do!
It's "da bomb" as my son would say! lol
How do you like my new background!?
I picked it up from “cute n cool”.
Don’t you just love it? I do!
It's "da bomb" as my son would say! lol


[by now I’m steaming from the ears and VERY frustrated]
but this time I roughed up the painted surface with some fine sandpaper.
And here is what I got:

Maybe first time was a charm?


(sorry blogger isn't working properly today for links)


but Windows 7 won’t let me install them no matter what I try!
Darn technology!
It’s a crime I tell you!
The pic below shows how I printed them off the first time.


No comments:
Post a Comment
I welcome your comments and always look forward to reading them! Thank you!